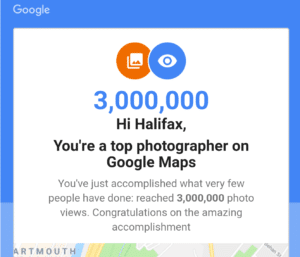
Recently I received an email from Google informing me that my Google Maps photo views surpassed a milestone of 3 million views. A proud accomplishment and a good opportunity to reflect on my journey as an amateur nature/landscape photographer. I’ve spent many thousands of hours both trekking through the wilderness and sitting at my desk editing. An interesting dichotomy that I’ve come to enjoy. I hope this rundown of my ever-evolving photography will help you learn some of the lessons I have along the way. If you enjoy this post or any of the other work I do with HalifaxTrails.ca, support it to help me continue the journey.
In The Beginning…
The Dawn Of The Digital
My photo library began in the early 2000s, coinciding with the dawn of the digital photo era when cameras didn’t produce the best quality images. The digital medium revolutionized photography for other reasons, like removing traditional barriers of expensive film and having to take it to a store for processing. Now anyone could get into photography without any expense beyond the camera. The simplistic ease of use of these popular point-and-shoot cameras allowed me to snap pics to easily share with friends and family. I couldn’t have cared less about composition theory or the technical artistry of photography in these early days.
Early Outings.
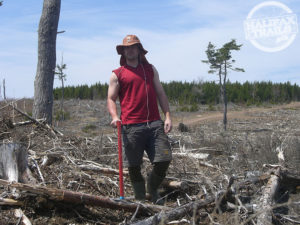
When I tree planted as a summer job, I brought my digital camera with me to capture interesting scenes to share and keep memories for myself. I captured contrasting shots of natural beauty and the devastating effects of industry which are typically hidden from most people’s view. This is when I began nature and landscape photography.
I wanted to be able to portray the daily scenes of tree planting. Starting my days with warm sunrises over cool misty valleys, and ending with scorching heat bleaching a devastated clearcut wasteland.
I began paying attention to framing and trying to capture the essence of these scenes. I also learned the practical challenges of photography in remote areas in all different kinds of weather.
The Next Step
Around this time, I launched the website HalifaxTrails.ca where photography is an important aspect. I wanted to take my photography more seriously so I dug deeper into the art and science of photography.
I began reading and researching, mostly through landscape photography magazines. I gravitated towards the magazines that showed a great shot and explained the camera settings behind it. This helped direct my photography in a more disciplined direction.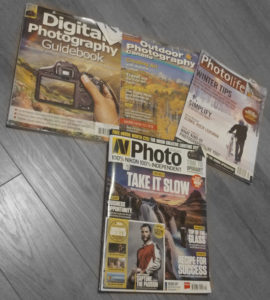
Now I head out with a plan and an idea as to what settings I intend to use for certain destinations. Mix in some experimentations with new approaches and it’s a recipe to continually improve and evolve.

Lessons Learned
Looking Back.
Every photographer can give you a different list of things they wish they knew when they started out–like wishing they spent more time studying the X’s and O’s of all the camera settings.
Personally, I learn more by going out and doing. I highly recommend getting a command of the basics such as aperture, shutter speed and ISO. Those settings are the basic tools required to get the exact photo you’re aiming for.
A New Approach.
Beyond those basics, I think it’s most important to learn by doing, by trial and error. This does not mean taking 200 photos and hoping a couple of them turn out. That’s a mistake I made for a long time. There are two main problems with that approach: 1) Sifting through and editing 200 photos is a logistical nightmare. 2) You learn much more from spending time setting one particular shot than you do from sifting through many which you don’t even remember the setup process.
You aren’t going to examine the approach used for each photo of a huge batch, which makes it hard to come away with any meaningful lessons. I made the biggest strides by taking fewer photos, spending more time on one shot and examining the settings when I was home editing.
Most photo editing software will show the camera settings used for each shot. It could be buried in menus, usually filed somewhere under a heading like “details”. These details will include the ISO, aperture, shutter speed and more. It is one of the most useful tools when reviewing your photos. Making a mental note of the best settings used for certain situations is where I started to make big improvements and gain confidence that my intentions can be turned into predictable results.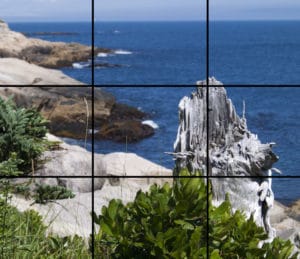
Composition Theory.
Beyond the settings of the camera, the composition is extremely important. It’s disappointing to get home and edit that perfect shot, only to realize that you cut off a cloud, tree or rock that is important to the overall composition.
These parts of the photo may be seemingly unimportant at the time but can be aspects of a perfect shot, in hindsight. Take the time to perfectly frame a steady shot, turn on the grid lines that are on almost every phone or camera to help you with this. These grid lines help you compose a shot following the all-important rule of thirds. A lesson I learned is to always look at the corners and outside edges of your shot while you’re framing it to make sure you’re not cutting off anything important to the overall composition.
Photography Yoga
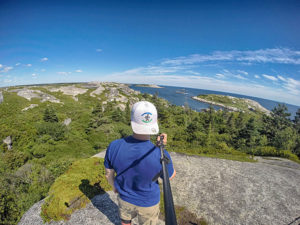
The best shots, more often than not, come from uncomfortable angles. While most people’s inclination is to take everything from standing eye level, better photos await when you aren’t afraid to contort yourself into positions that are sure to entertain passers-by. Rather than relying on the zoom of your lens, it is always better to physically place yourself at the right distance and position and make fine adjustments with your zoom from there.
Equipment
When I started, I used some of the typical point-and-shoot cameras of the era that required no manual settings. They were fun, easy and did their job just fine. Great for sharing with friends and family but not so great at capturing stunning landscapes.
I’ve never spent more money than what’s required for a basic entry-level model of any camera. I’d love to have the better equipment, but until that becomes a realistic possibility (with enough support), I’m satisfied with what I can produce with my entry-level models. The common wisdom that a good photo is the result of a good photographer (not the camera), is largely true.
DSLR’s
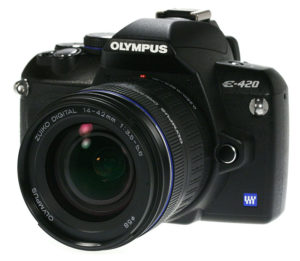
I graduated from a point-and-shoot to the cheapest entry-level DSLR at the time, an Olympus E-420 which treated me well for years. Its small form-factor allowed me to bring it along on hikes, and it took great pictures compared to anything I had previously. This is the first camera with which I began to set up photos by experimenting with manual settings.

Action Camera Revolution.
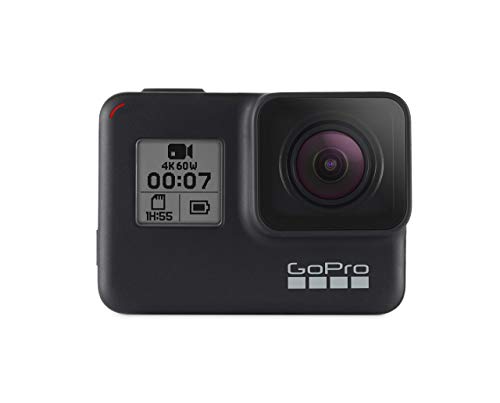
 Next, I bought a GoPro Hero 2 Silver, on my wishlist for a while. It had many features ideal for outdoor adventures. Waterproof, indestructible, small and great picture and video quality, it ticked every box for me. Its wide-angle lens was a great compliment to the narrower kit lens on my DSLR.
To mount the GoPro, I bought a “selfie-stick”. I hate that moniker and think of it more as a walking stick that doubles as a tripod. The majority of all of my new outdoor adventure videos were filmed with this camera setup. Its versatility and quality made it my favourite piece of equipment. The versatility and ease of use made it available for any moment a great photo or video presented itself.
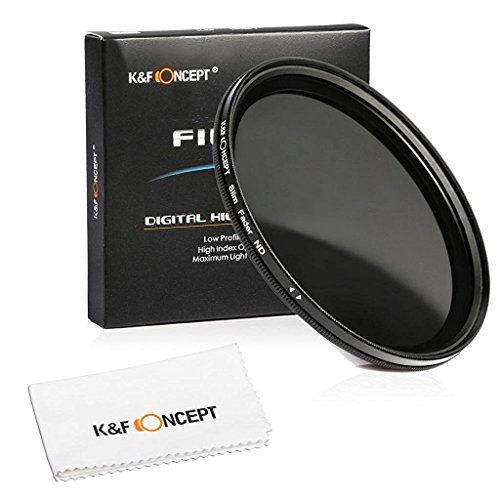
Filters.
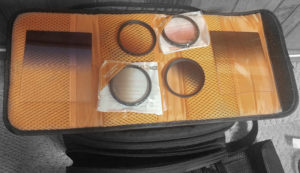
I learned about and began using various filters for my DSLR, which brought my photos to a new level. My filter collection includes a clear filter, various graduated neutral density filters, polarized filter, and neutral density fader. I recommend having each one of these in your bag at all times.
The clear filter will protect your valuable main lens, allowing you to throw out the scratched filter rather than your entire lens. Graduated neutral density filters are a must when capturing bright skies, snow or other layers that are much brighter than the rest of the picture. It will darken the sky so that you can actually have detail in the clouds rather than a washed-out white blur.
This was a game changer to my photos and I think you’ll find the same. Another game changer is a polarized filter. Identical to what your polarized sunglasses do, it greatly reduces glare from the sky or water so you can see the details in them. It’s very noticeable with water, and I wouldn’t take any water shots without one.
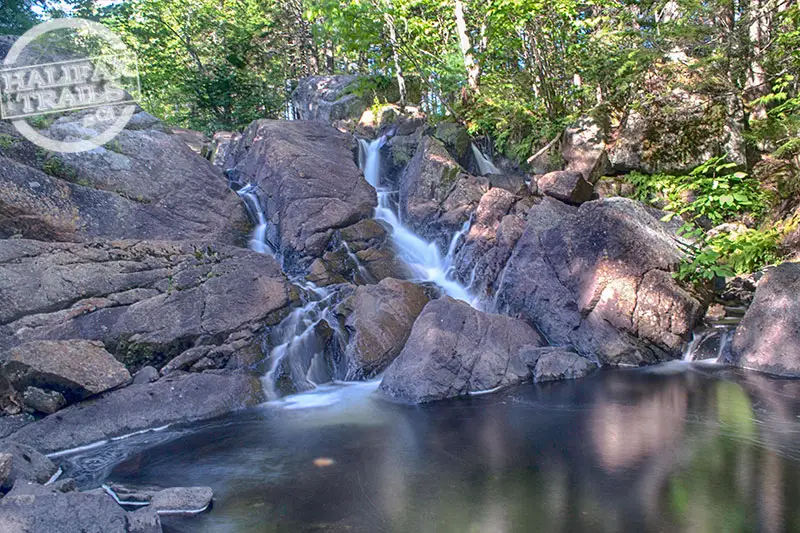
Finally, a neutral density fader lens, which is essentially an adjustable neutral density lens. This means you can twist the filter to dial in your desired darkness, allowing you a long shutter speed without resulting in washed out, ultrabright garbage. I use this for moving water, like a waterfall, river or the ocean. Using a tripod and the self-timer function or remote control on your camera is a must. Your camera has to be perfectly still for any long shutter speeds. The resulting photos will turn waterfalls, rivers, and oceans into an artistically pleasing soft, glassy smooth blur.

Two Steps Forward, One Step Back.
This group of equipment treated me well until my camera bag full of all of my cameras and equipment got stolen out of my car. I always engrave my contact info onto expensive gear in case it gets left behind or lost. This actually paid off one time when I accidentally left a tripod behind and had returned to me by the good people of Kejimkujik National Park. What I never anticipated was losing all of my equipment in one fell swoop.
Theft can be combatted in a more modern way. There are websites which allow you to upload a photo from your stolen camera to obtain the serial number, and trace any new public photo uploads from it. I didn’t have any luck with it in my case, but it’s a good last resort.
The Rebound.
Losing all of my camera gear was pretty devastating and forced me to make some tough choices. I considered giving up on the forms of photography I was doing and be limited to my phone. In the end, I decided that my website and photography relied on these cameras and they should be replaced, even at great cost. I saved, borrowed and endured economic hardships to do so. It was a bold decision at the time, but one that I don’t regret.
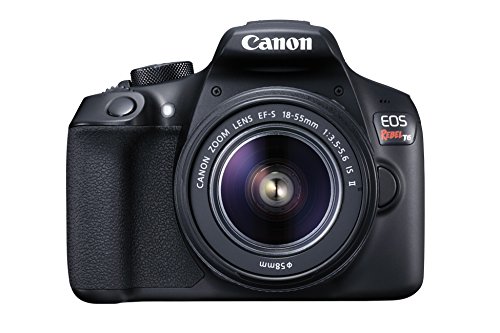
To replace my stolen Olympus and GoPro I again bought one of the cheapest entry-level DSLR’s (Nikon D3100), but upgraded to a GoPro Hero 3+ Black (The best model available at the time). Both cameras were significant upgrades as the technology had progressed. It felt great being back in business with upgraded equipment. The new cameras renewed my inspiration and confidence to create bigger and better things.
The cameras have allowed me the versatility to take almost all of my desired shots and are still my go-to cameras today. Sure I’d like to get a full-frame high-end DSLR, but my budget won’t allow for that any time soon.


Where Phones Fit In.
Phones have come a long way since the days when I thought it was ridiculous to have a crappy camera built into a phone. What I didn’t foresee is the day that my phone could take photos that rival a DSLR.
It’s still good to learn basic camera settings so you can switch your phone’s camera into manual mode and really take control of your shots. Some of my best shots are now taken with my phone (which is somewhat disappointing when they turn out better than shots I spent 10 minutes setting up with the DSLR).
With quality that rivals traditional cameras, you can certainly use it as your only camera. As with traditional cameras, you should dedicate yourself to learning all of its features and get a feel for what it does and does not do well.
I still use it only as a supplement to my DSLR and GoPro as the ability to post-process its .jpeg files is far more limited than the .raw files that dedicated cameras are capable of. The best thing about phones is that you’ll almost always have it with you. Having a camera at the right place and the right time is often the most important aspect of amassing a great photo collection. In that respect, it’s sure to become one of your most important cameras.
The Future Arrives, Again.
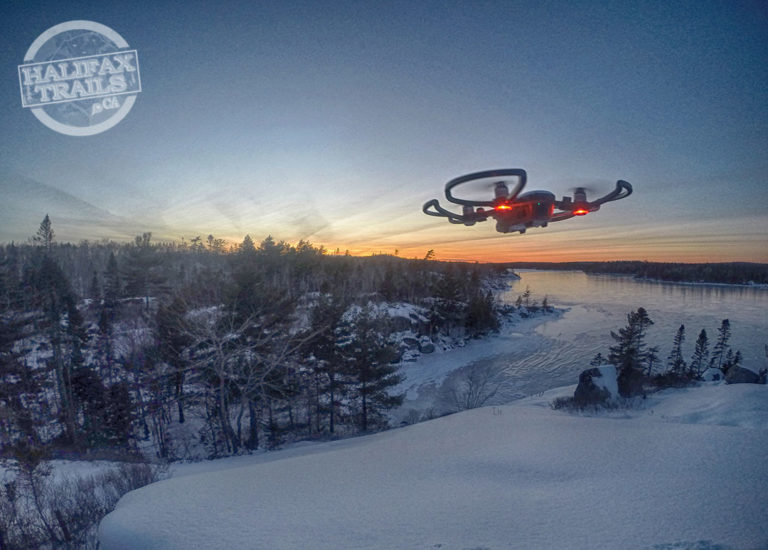
Newer additions to my kit have been the LG-360 camera and DJI-Spark drone. The 360 camera has been one of my favourite additions. Being able to capture a full 360° panorama of a place that no regular photo could do justice, has been awesome. The ability to take videos and time-lapses as well as photos make this a great tool to help my audience get a true feel for a location. The LG certainly isn’t the best 360 camera, and as they quickly evolve, its now likely one of the worst. The resolution and overall picture quality aren’t great but it does its intended job well. It’s small enough to slip into my pocket and weighs next to nothing, so it’s no problem bringing it on long hikes. Newer, much improved 360° cameras are on my radar now, as I’d love to increase the quality of my 360° photos and videos that have become a staple on HalifaxTrails.ca. The logistics of editing 360° videos and photos require significantly more computing power due to their huge file size. Converting them into a file that’s shareable is sometimes another necessary step, but seems to get easier as the technology becomes more common.
 Like the 360° camera, the drone is a way to capture a landscape or perspective that you cannot do with any other camera. When I saw you could now get a good quality drone for under 1000 dollars, I did some research and purchased the DJI-Spark. This thing is so much fun that I can’t even describe in words what it’s like to use. The photos and videos it takes are surprisingly great. The thing I like most about this particular model is its extremely small size. I can take it on any of my outdoor adventures without being too hindered by the size and weight. The batteries only last 10-15 minutes per flight which is a fine compromise to me. Along with a couple of spare drone batteries, I recently bought a huge capacity battery bank. It allows me to charge my phone, cameras and drone while on location. The battery bank is significantly heavier than my drone and is actually now the heaviest thing in my pack. It’s a necessary sacrifice in order to be able to bring all of these cameras and not worry about running out of juice. Until the direct correlation between battery capacity and weight changes, it’s a necessary evil.
Post-Processing
Taking a great photo or video is only half of the work required to end up with a stunning work of art. While there are many apps and programs that let you do basic adjustments or even auto-adjust for you, to get a polished shot you need to sit down with your computer and go to work.
21st Century Artistry.
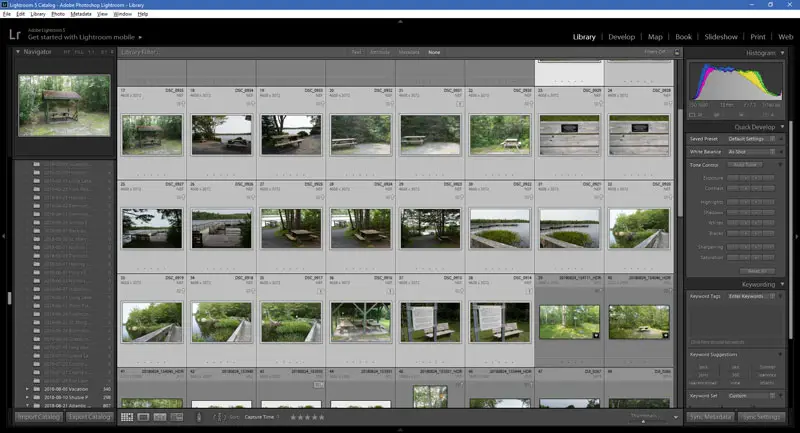
Much like the old days of toiling in a darkroom to develop film, great photos nowadays are developed in Photoshop Lightroom or other professional software. Photoshop gets a bad rep for airbrushing people into surreal barbie dolls, but with landscape photography, it can actually make a shot look truer to real life. Post-processing is an art in itself and should be respected as such. A Photoshop brush is equally as powerful to a digital photo as an actual brush is to a canvas.
You can do as little as adjusting the brightness or as much as airbrushing and applying digital filters for a surreal look–both completely fine depending on the artistic style you’re aiming for. The more hours you put into processing and editing, the more you will learn about fine-tuning a photo to form it into exactly the shot you want. The best photo you will ever take will be a 50/50 combo of setting up a perfect shot and doing equally great work fine-tuning it in post-processing.
Video Production.
As for videos, they can be a lot more work, but equally rewarding when you end up with a satisfactory result. It’s a great accomplishment to be able to capture and compile the essence of a moment, scene or adventure into a concise video. I am by no means close to being proficient, but I really enjoy the challenge and lessons along the way. As opposed to photos, videos should tell a story in the traditional sense. Being able to share a great story with others is my ultimate goal with any video.
There are plenty of free programs which can do great jobs, but for me, I knew Adobe Premiere Pro was one of the professional standards so I dove into it with hopes of one day becoming proficient. Just like Photoshop, the post-processing you do in Premiere Pro is all-important to producing a good result. Unlike Photoshop, it’s not just about playing with saturation, brightness, contrast and other adjustments.
With videos, the artistry involved is limited only to your imagination. Any time I see video productions now I’m looking at the ways they shot and edited each scene and trying to picture how I would replicate it. Playing with speed, transitions, timing to music, adding titles and other special effects make it something that can take up a lot of your time. Each 5 minute (or less) video I create is the result of days or weeks of editing. As I progress, my workflow gets more efficient, resulting in a decrease in the amount of time required to produce something acceptable.
Often with video editing, you will be limited to the power of your computer. Mine is an old one on its last legs, so video editing with it can be extremely painful when working with lots of large files. Again with videos as in photos I learned that fewer shots are almost always a better approach. Setting up an artistic 3-second shot is always going to be better than a 5-minute long clip. There’s no realistic way you’re going to edit hours of footage down to something that’s actually watchable. On my outings now I try to only take short clips of the most scenic spots, rather than a long video diary. Piecing these short clips together, eliminating the shots that didn’t work and fine-tuning the ones that did is a lot easier than trying to reduce a mountain of footage into something that’s pleasantly digestible.
Cleanliness Is Godliness
There is nothing worse than a lens smudge ruining a great shot. Keeping your lenses clean is an ongoing battle that you should make a habit before and after heading out. Before I head out on a hike I clean my lens with a dust brush, microfiber cloth, and alcohol (here is a great kit with everything you need). I do the same after returning, and always have cleaning equipment on hand when on location. How can the lens get dirty when it’s just sitting around in between? Good question, but from my experience it can.

Cleaning your gear should be a habit bordering on obsessive-compulsive. When the bright sun hits your lens it will expose any particles as a lens flare or smudge. These shot ruiners aren’t something that can be fixed with editing and its best avoided at all costs. Even with my indestructible GoPro, I make sure to clean the lens so that water doesn’t stick to it. After cleaning it with alcohol I use Rain-X which makes water bead off the lens. I always store some humidity absorbers in my camera bag to dry out any moisture and fog that can build up in certain conditions. In winter I will stick my cameras in a sealed Tupperware container full of these desiccants after a shoot. Exposure to sudden temperature changes will result in a foggy lense, so be prepared by trying to gradually expose your gear to the desired temp beforehand.
Great Photos Need A Home
In the old days before digital photography, every photo had a certain value. The paper it was printed on and processing costs meant even the worst photos carried a cost. Nowadays photos are a dime a dozen, even breathtaking ones. I never cease to be amazed at the number of awe-inspiring photos on Instagram that only garner a handful of likes. 
I have learned that trying to sell photos is something that only professionals can really make a living doing. I’ve stopped putting much effort into marketing and selling my work and focus more on the value they have to me personally. That value often involves being able to share a moment in time with others. Being able to convey the essence of being in a certain time and place is my ultimate goal.
Whether it’s posting it on social media, using it as your device’s background or presenting them in a slideshow, being able to share with others is what makes it rewarding. For your favourite photos, I highly recommend making a large print and framing it. It’s a point of pride to have created something to put on prominent display. Minor artworks are a dime a dozen at home decor outlets, so why not create something more significant? There’s no better gift than a meaningful work of art, and a framed photo is just that. I’ve recently had family members request certain photos to print and hang on their walls and to me, that’s worth more than any monetary value.
Onward And Upward
As I continue filling hard drives with photos and videos of beautiful places here in Nova Scotia, I hope you’ll continue to follow my progress and let me know about yours in the comments below. Feel free to browse my constantly updating collection at Multimedia.HalifaxTrails.ca. If you appreciate this post and want to support the work I put into Halifax Trails click here. Browse my online shop for recommended camera gear, electronics and more.
Happy Trails!

- The 5 Most Popular Parks & Trails of 2025 (And Why You Should Hike Them in 2026) - February 12, 2026
- The Best Hiking Trails Near Halifax For Every Kind Of Hiker - July 8, 2021
- Nova Scotia’s Climate Emergency - March 26, 2021